

ARCHITECTURE
TAYLOR'S
UNIVERSITY
BY
TAN WUI XIANG

COMPUTER APPLICATION
Project 1: Modelling of an Architectural Design
This involves completion of basic form and external model of a selected architectural design. During this stage the completed 3D model will reflect the knowledge of using the software to create 3D geometries. 3D models will be assessed on the overall detail, complexity and creativity used in the creation and development process.
Step 1: autocad


the plans and elevations are measured and traced on an attached image.


Step 2: rhino

all the files are import to rhino.
the elevations are group and rotate to 90 degree.
the elevation is snap to the end of plan.
the elevations are extrude to wall and then delete the elevations.

extrude the remaining wall as same height to the elevation.

copy the wood panels and snap to the end.

extrude and copy the stairs as well.

create a roof 4 points roof surface.

extrude the roof by turning on solid to yes.

command cylindrical and copy it to finish the columns.


lastly, create the landscape by using curve lines, move the curve lines according to the contour height and command patch.
command points on to adjust the height of the contour.
 |  |
|---|---|
 |  |
 |
Project 2a: Still Rendering with Materials, Lights, Camera Views with Site Context (exterior rendering)
The second project involves the production of photo realistic still rendering of the selected architecture design with materials, appropriate camera views and post-production enhancement on the visual outcome. The visualization work would be assessed on the types and ways materials are used, types of lights and effects used to set up the scene, setup of appropriate camera views for rendering and skills of using post-production tools to enhance the visual outcome.

Step 1: 3ds max
change the rhino 3dm file to 3ds file and import to 3ds max. first, set the daylight to manual and change the sun to mr sun mr sky.

set the mr sky portal on the top of the house.

in the environment setting, change to mr physical sky, mr photographic exposure and outdoor daylight exposure.


set the rendering engine to mental ray, so that the mental ray arch and design material can be applied.

after applied the materials, set the uvw map at the editor, arranged all the wood panels in same size.
render the selected camera view into 600x800 resolution.

set 2 free camera view in eye level before rendering.


applied shadow, brightness and contrast etc. to fit the landscape and the house.
Step 2: photoshop
 |  |
|---|
Project 2b: interior rendering


set the camera view inside the house.
apply mental ray photographic exposure, set to indoor daylight and set the exposure value to 11.
import the furniture at archive 3d and apply the bitmap material into the furniture.
import to photoshop and apply background.
 |  |
|---|
Project 3: A maximum 90 seconds Animation of the Completed 3D Scene
step 1: 3ds max


draw the path which i want it to be the camera path.
the target of the camera can be adjusted. in this case, i adjust it to the center of the house.
the camera must be target camera, or else the camera will orbit freely not targeting the house.

the path can be adjusted high and low so that the camera will be more interesting. to edit, applied edit spline at modifier list and double click the black box of edit spline, choose vertex so the vertex of the circle can be adjusted.
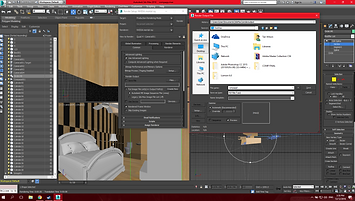


SET TO THE ACTIVE TIME SEGMENT IN COMMON PARAMETERS AND THE OUTPUT SIZE TO 720 X 1280 SO THAT THE RENDERING IS IN FRAME PER SECOND.
CHANGE THE SETTING IN RENDER OUTPUT, BY CLICKING FILES, SAVE AS AVI FILE TYPE, SO IT WILL BE A VIDEO FORM.
BECAUSE THE RENDERING OF 3DS MAX IN FRAME PER SECOND IS TOO SLOW, SO I CHANGE THE RENDER ENGINE TO LUMION 6. IT IS SLOW IN 3DS MAX AS THE TREES AND LANDSCAPING. I EXPORT THE FILE TO 3DS STUDIO FILE AND IMPORT TO LUMION 6.
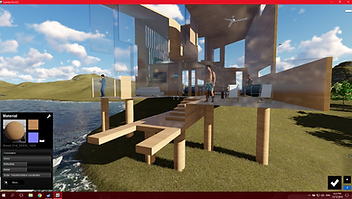


step 2: LUMION 6
IMPORT THE 3DS STUDIO FILE TO LUMION 6.
APPLY THE WEATHER AND SURROUNDING OBJECT.
APPLY THE MATERIAL AND SET THE MATERIAL SETTING.


APPLY THE TARGET LIGHT IN ADVANCED LIGHT SETTING.
ALSO, APPLY THE OMNILIGHT AT THE BOTTOM OF ALL COLUMNS IN ADVANCED LIGHT SETTING.


GO TO VIDEO BUTTON AND SELECT THE BLANK, CHOOSE RECORD TO MAKE THE FRAMES.
TAKE THE PHOTO OF THE PATH, IT WILL AUTOMATICALLY FORM A VIDEO, THE MORE PHOTOS TAKE IN ONE PATH, THE SLOWER THE SPEED OF CAMERA MOVE.
SAVE THE VIDEO IN 720 X 1280, 30 FRAMES PER SECOND IN MP4 FORMAT.

STEP 3: WINDOWS MOVIE MAKER
ALL THE SHORT VIDEO COMPLETED IN LUMION 6 IS TRANSFER TO WINDOWS MOVIE MAKER, ADDING THE EFFECTS AND BACKGROUND MUSIC. ALSO, CUT THE UNNECESSARY PART OF THE VIDEO SPLIT THE VIDEO TO RUN PERFECTLY WITH BACKGROUND MUSIC AND COMBINED ALL THE SHORT VIDEO.